Dashcams are useful for maintaining maximum vehicle security, and installing one can be a bit of a pickle. A proper dashcam installation guarantees complete coverage of all angles of your vehicle. However, an incorrect installation can cause damage to your car engine and reduce the efficiency of a dashcam installation. Who can hardwire my dashcam? To guarantee proper installation, we recommend hiring the right professional or following the correct steps from certified manufacturers.
A proper dashcam hardwiring is executed by a competent professional. Nonetheless, motorists with little or no technical knowledge can hardwire a dashcam by following the manufacturer’s instructions to the latter. Most owners prefer DIY (Do it Yourself) as the process is fairly simple, stress-free, and inexpensive. You need the following necessary tools to hardwire your dashcam yourself: hardwiring kit, essential kit, pliers, car manual, socket wrench, and electrical tape.
There are numerous ways of installing a Dashcam in a vehicle. However, hardwiring is arguably the neatest and most effective means. Keep reading to find out tested steps to hardwiring a dashcam to your vehicle’s fuse box.
Table of Contents
How to Hardwire Dashcam
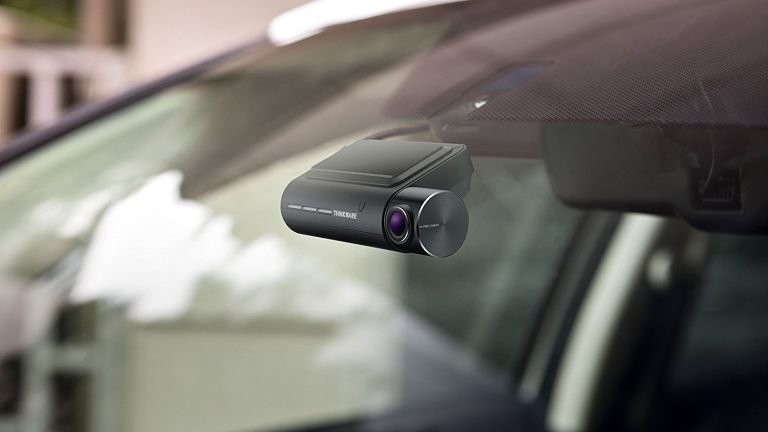
Step 1: Decide on Dashcam Positioning
Dashcam should be mounted on the windshield, in the driver’s view. But make sure not to obstruct the driver’s view to avoid a blind spot while driving, which could result in accidents and collisions. We recommend mounting your dashcam under your rearview mirror for the best view. This spot provides the best natural view for the driver without obstructing the road ahead. This provides drivers with quick access to quickly adjust settings, positioning, and view footage with ease. The size of your dash cam also matters for positioning. We recommend advanced dash cams that fit perfectly into spaces.
Step 2: Locate Your Car’s Fuse Box
The second step is locating the position of your fuse box as you’ll need to connect the dashcam power cable to power the unit. Modern cars are equipped with more than one fuse box, so motorists have to decide which option is better and closer to the position of the dashcam.
You can find your car fuse box on the driver’s side, under the steering wheel, the engine, or in the glove compartment. Having trouble locating your fuse box, consult your manufacturer’s manual.
Step 3: Route Power Cable
Lay the dashcam cable neatly across your windshield, creating a path to the car’s interior panel. This is important to keep your wiring neat and out of sight. Line the cable between the windshield and roof lining for best results.
Step 4: Add circuit kit to Hot in start
Next, connect your circuit kit to a hot-in-start fuse in your car. Avoid connecting to an always-hot-fuse as this would keep your dashcam powered all the time, thereby draining the car battery and consuming storage space.
You want to connect to a hot-in-start fuse to power the dashcam immediately after the ignition is turned on and power off the dashcam when the ignition is turned off. We recommend buying advanced dash cams with parking surveillance to better manage storage and performance.
To identify a hot-in-start fuse, you’ll need a circuit tester. The circuit tester indicates the presence and absence of a circuit in the fuse. If it indicates power when the ignition is off, that’s an always-hot fuse.
Step 5: Add the Installation Kit
Remove the hot-in-start fuse and plug it into the installation kit. Make sure your vehicle’s ignition is switched off before removing the fuse to prevent electrocution. Once you’ve successfully connected the installation kit and the fuse, plug the kit into the empty fuse space. Next, ground the wiring on the vehicle’s chassis.
Make sure you have followed the instructions to the letter, and followed the steps accordingly. Inspect your connections and if satisfied, test the dashcam by switching on your vehicle’s ignition. According to our instructions, the dashcam should power on immediately when the ignition is switched on.
If it doesn’t, then check your fuse to make sure it is hot. If not, test another fuse. If after numerous attempts your dashcam isn’t successfully powered up, consult a professional to have your fuse box checked. Buy the best-advanced dash cams here to guarantee 100% quality.
Hardwiring your dashcam leaves it connected 24/7 and provides the neatest and smoothest installation. However, it may require a bit of technical know-how.
Other Ways To Install Dash Cam In Your Vehicle
Hardwiring a dashcam to your fuse box is the neatest way to install a dashcam, however, there are several other means to achieve a seamless dashcam installation. These include:
● Cigarette Lighter Socket (CLA) Installation
● OBD Installation
● Battery Pack Installation
● CLA Installation
Cigarette lighter socket installation is the easiest way to have a dashcam in your vehicle. All you need to do is connect the cigarette adapter power cable to your dashcam.
New dash cams come with suction cups, which enables motorists to place their dash cam on their windshield. Find the best spot on your windshield that wouldn’t cover the driver’s view. Mount under the rearview mirror for the best view.
CLA installation allows for quick transfer between vehicles. You can also connect your dashcam to your smartphone or other compatible devices via a wireless network. However, CLA installation is not as neat as hardwiring and requires a vacant 12v cigarette socket.
● OBD Installation
Advanced dash cams have an OBD cable that allows motorists to connect the dashcam to the OBD port in their vehicle. Unlike CLA installation, OBD installation provides features that match dashcam hardwiring. Free up cigarette sockets for other uses and enjoy parking surveillance by installing using OBD cable.
● Battery Pack Installation
Battery pack installation provides better features and helps to enhance the functions of a dashcam. For example, a dedicated battery pack improves the capacity of your dashcam to record for longer when in parking surveillance mode, thereby reducing the load on your vehicle’s battery. Battery pack installation can be achieved through hardwiring and cigarette lighter adapter.
Before going ahead with any of the following options, we suggest that you consult your manufacturer’s manual to prevent wrong connections and damages.
Different Ways To Mount Your Dash Cam
Most people focus only on hardwiring and installation of dash cam and fail to focus on proper mounting. The mounting spot is important as it determines the driver’s view and usage. As mentioned earlier, avoid mounting the dashcam in any spot that’ll block the driver’s view.
We recommend mounting around the rearview mirror or close to the passenger side. Avoid mounting on the driver’s side. Adjust the dashcam’s display so you can see the details.
Suction-Cup
Double-Sided Tape
Will My Dashcam Obstruct Sensors
Most advanced cars are equipped with sensors for rain detection and other advanced car assistance systems such as radar detectors that can be affected by other in-car installations. However, car sensors work optimally even with dashcams.
How To Remedy Dashcam That Keeps Falling Off
Air is the number enemy of suction cups, causing them to fall off while you drive. This may affect the functionality of the device. For example, in the case of an accident and the suction cup falls off, you’ll miss out on recording important footage that’ll help accelerate your insurance and compensation claims.
Securing your dashcam to your windshield is also important to prevent damage to the device, as constant drops may damage the unit. How to remedy a dashcam that keeps falling off? Read the following steps to find a solution.
● Clean the windshield regularly. Remove the suction from time to clean both the device and the windshield. This with hot water helps to ensure a firm hold to your windshield. You can also use Vinegar or alcohol for better results.
● Apply oil and petroleum jelly on the rim of the suction cup during installation to ensure a firm grip. Apply in moderation as too much petroleum jelly or oil can cause it to fall off easily.
● Use adhesive tape to secure the dashcam to your windshield. This is the best way to stop your dash cam from falling off.

