While you won’t find a ton of guides on how to adjust backup camera guidelines, learning how to adjust it when it overlaps or has an error is important for enhancing efficiency and performance. You’ll find out that adjusting your backup camera is also important for when you need to make quick adjustments too. How to adjust backup camera guidelines? Keep reading to learn more

Adjusting backup camera guidelines involves a couple of steps that need to be followed to the latter. Without wasting any more time, let’s dig right into those steps.
GET EPIC DEALS ON AMAZON TODAY. UP TO 40% OFF.
Table of Contents
STEPS FOR ADJUSTING BACKUP CAMERA GUIDELINES
Unfortunately, these steps are not written in stone and vary between the different types of boxes. Each manufacturer provides a distinct way for adjusting guidelines from the other. You can find out how by simply checking the manufacturer’s manual. Nonetheless, we’ll take you through the popular factory-installed backup cameras.
● Garmin
Garmin provides some of the best backup cameras. They provide advanced cameras with additional features and functions such as guidelines. However, these guidelines can be too wide or narrow, thereby, too difficult to use. To adjust Garmin backup camera guidelines, follow the steps below.
Position your vehicle near a driveway, parking stall lines, or curb. Once you’re satisfied with your positioning, power on the backup camera and navigate through the settings. Click Apps from the main menu, and select rearview. This will take you to the context menu. Select settings and navigate to Adjust Guidance lines.
● Pioneer Avic
Pioneer Avic is another popular backup camera brand in the region. They provide advanced camera options and can be found in several vehicles.
To adjust a Pioneer Avic backup camera, park the vehicle and apply your handbrake. Next, make sure the vehicle is equally spaced on both sides. This can be achieved by using a measuring tape. The recommended measurement for the sides is 25 and 2m from the rear bumper. Once you’re certain that the measurement is correct, shift the gear into reverse to on the display on the monitor.
Adjust the guidelines by using the navigation arrows on the head unit.
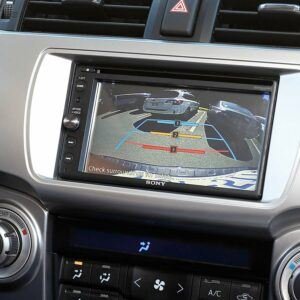
HOW TO ADJUST BACKUP CAMERA ANGLE
There are some necessary tools to have handy when adjusting a backup camera. This includes a screwdriver, drill, and grommets or washers. Asides from having the right tools, there are also a couple of precautions to take before you start adjusting your backup camera.
Having the manufacturer’s manual with you and following every instruction and precaution helps you ascertain that you’re doing the right thing. Manufacturers include precautions to take with each device and some might also include maintenance tips. If you’re not handy, then invite a competent friend over or simply hire a professional to execute the job.
If you’ve gotten all your tools and taken the right precautions, you can then proceed with adjusting the guidelines. Motorists will have to know the specific way to adjust each backup camera type as they are all designed differently. While some mounts are easily adjusted, others may require extra effort.
Adjustable Backup Camera Mounts
While there is a myriad of opportunities to choose from when picking a backup camera for your vehicle, only a handful are adjustable after installation. You may need to upgrade to a better version if your existing option is not adjustable.
● License Plate Backup Camera
This is the most common backup camera mount. It is easy, and the license mounting area provides for quick installation. Other installation options require drilling and extra modifications, which may deface your vehicle. In addition, the license plate backup camera is cheaper as it only requires minimal tools and can be done by yourself.
This type of mount is located close to the road. However, you can find it higher up in bigger vehicles. When it’s too close to the road, your view is limited and obstructed. You will need to adjust by mounting it higher. This level of mount is also prone to damages and may require regular maintenance to keep the lens clean.
-
Flush Backup Camera
While the license plate provides an already made mounting spot, others such as flush backup camera mount require a hole in your vehicle. You’ll need a drill and several other tools. The flush backup mount can be on both sides or rear of the vehicle, or anywhere you’re comfortable to make a hole. You need to make an accurate hole to avoid damaging your vehicle.
Unlike license plate mount, flush only provides a limited field of view and may require constant adjustment to get the best out of it. The benefit of this type of mount is that the body is hidden inside the vehicle while the lens sticks out from the hole.
-
Snap-in Backup Camera
The snap-in backup mount is in many ways similar to the flush backup camera. First, it requires drilling small holes in the body of the vehicle. However, snap-in mounts are small and lightweight, and can easily be adjusted.
If you’re looking for an inconspicuous backup camera, this is your best option. Its small size prevents it from disfiguring the beauty of your vehicle. It is also protected from collisions and rear accidents.
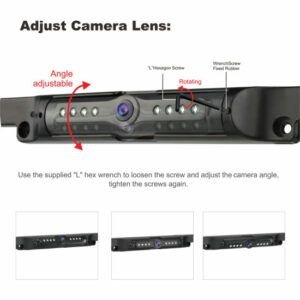
How To Adjust Backup Camera Lens Enclosure
This only requires a couple of simple steps. Start by removing the screws to remove the camera enclosure from the mount. You can now adjust the angle of your camera to fit your preferred perspective. Be careful not to damage the lens as you adjust the camera. Once you’re done, tightly screw the device back into its enclosure.
How To Adjust License Plate Mount
Most license plate mounts have adjustable lens or enclosures and can be installed into the existing license plate frame. The other type of license plate mount requires grommets or washers for adjustment. This means motorists have to purchase them before camera adjustment.
To adjust the backup camera, simply add a few grommets underneath. This pushes the camera further up which provides a wider field of view. If it’s too high, just remove some of the grommets and readjust the camera.
How To Adjust Surface-Mount
The last type of backup camera mount is the surface mount. They come with mounting brackets and their own casing. These help to ease installation. To adjust this mount, place washers between the mount and the surface.
Reasons for Adjusting Backup Camera
- You can see your plate number
- Obstructed Field of View
- Limited range of vision
- You can see the bumper.
- The camera is angled wrongly
Maintenance Tips for Backup Camera
If the problem still persists after adjusting the camera, then it might be from other problems affecting the device. Some of these issues can be easily resolved, while others may require additional effort.
-
Clean The Lens
Manufacturers recommend wiping your backup camera lens every morning before leaving for work when dealing with moisture. However, other activities may take our attention the other way, thereby causing dirt and grimes to build up on the camera lens. This causes blurry images and several other display problems.
Use isopropyl alcohol and soft fabric to clean the lens. Don’t use harsh chemicals as they may remove the protective materials on the lens.
-
Replace Worn-Out Cables
Cables exposed to weather and animal contacts are quickly frayed and destroyed. Damaged cables cause numerous other problems for the backup camera. And may reduce performance. Make sure the new cables are strong yet flexible and the length for connecting all the necessary devices and tools in your car.
Conclusively, adjusting your backup camera is a very simple task. All you need is to learn the basics of your camera mount and how it can be adjusted. If your mount is not adjustable, then buy one of the advanced adjustable backup camera mounts here. We offer the best products with lengthy warranties.

