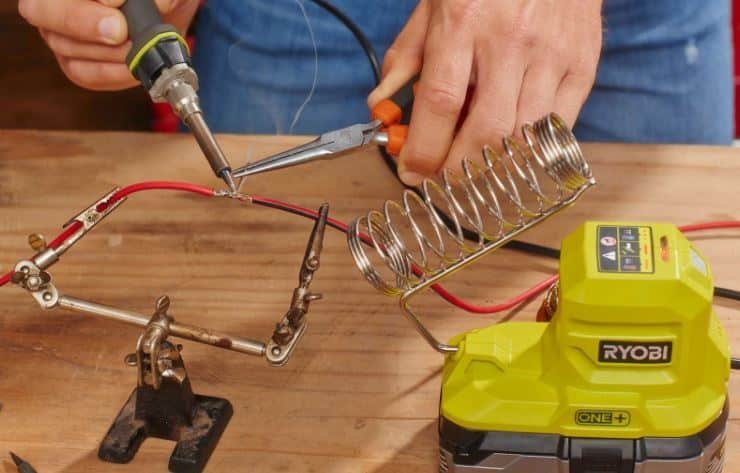
Audiophiles recommend soldering speaker wires for optimal speaker performance and high sound fidelity. It is also necessary to ensure longevity and secure connections. Soldering also comes in handy for troubleshooting broken wires or incompatible wire ports. Soldering car speaker wires serves several purposes. However, most motorists don’t have the slightest idea of how to solder car speaker wires. Soldering a speaker wire requires little skill but a complete adherence to the steps and instructions. So, how to solder car speaker wire is a necessary part of speaker wire installation and we’ll be taking you through the steps and familiarizing you with the necessary tools for soldering speaker wires.
To solder car speaker wires, first, plug the soldering iron into a power source. Then remove wire insulation before joining the wires together and place the hot soldering iron over the wires to join them with an iron strip together to the speaker or amplifier terminal.
This simple answer indicates how easy it is to quickly solder car speaker wires and any type of connection in your home. Caution: use high-quality soldering machines or guns and avoid any contact with your skin while soldering. Are you ready to solder your car speaker wire? Then read the following steps on how to solder car speaker wires.
Table of Contents
Step-by-step Process Of Soldering Car Speaker Wires
Pay attention to the following steps to achieve good car speaker wire soldering. Each step and instruction is important to the overall quality of the wire connections. We have also provided the best instruments and tools to accomplish 100% car speaker wire soldering.
Tools for Soldering Car Speaker Wires
● Soldering Iron/Gun
● Soldering flux paste
● Solder
● Shrink Wrap
● Electric Tape
Prepare The Speaker And Car Stereo
Rust, oxidation, and dirt can irritate the soldering process. Clean the wires properly with sandpaper or any appropriate material you can find nearby. Make sure the insulation is clean. Using a stripper, remove up to 5mm of wire insulation from the wire you want to solder. For better results and convenience, we recommend using holders to suspend your wires at different sides. Spread the part of the wire you want to solder to open like a flower and join them before thoroughly twisting together. This gives a very smooth, clean, and firm connection.
Heating And Soldering The Car Speaker Wires
After cleaning, removing insulation, and twisting the wires together, you can now go ahead with heating and soldering your car speaker wires.
Heating involves slightly placing the soldering iron over the twisted wires, before adding the solder from the other side of the connection. Make sure the solder melts through the wire by holding the soldering iron over the wire for a couple of seconds. If you notice bubbling on the joint, remove the soldering iron or gun and wait for 5 seconds before applying the soldering iron again.
Apply electric tape over the joint to properly isolate the connection. For a cleaner connection, use a shrink wrap before soldering the connection together. As you can see, soldering car speaker wires is fairly easy and not time-consuming.
Should You Solder Your Car Speaker Wires?
Soldering your car speaker wires ensures longevity and durability as long as you solder according to our instructions. The joint should be properly isolated after soldering to eliminate any risk of damage in the future. Proper soldering also guarantees maximum signal transfer between your amplifier and car speakers. Soldering, when done correctly, also prevents short circuits.
Pros of Soldering
● Proper soldering guarantees maximum transfer of signal, thereby preventing sound distortions. Enjoy 100% sound fidelity like never before.
● Proper soldering keeps your mind at rest as it lasts longer and can withstand the elements.
● Soldering is also an inexpensive option.
● A high variety of wires can be soldered together
● Minimal skill requirement.
Cons Of Soldering
● Soldering is time-intensive, especially for amateurs.
● Improperly soldered or isolated joints are prone to corrosion.
● Not useful under high temperature
● Only applicable to small joints.
If you’re finding soldering difficult, then let’s explore other ways to secure speaker wire connections in your vehicle.
Crimp Connectors
Considerably the easiest method of connecting car speaker wires at a joint, crimping only requires plastic and elastic deformation. The crimping process is straightforward and can be done by just anyone.
Remove wire insulation using a stripper to reveal the metal part of the wires. Measure the size by inserting it into the gauge to know the amount of insulation to remove. Ensure not to remove too much insulation to guarantee absolute isolation. Twist the wires tightly to ensure that it fully and effortlessly enters the connector
Insert both ends of the wires into the crimping connector. Press the tool hard to ensure a tight and secured connection. To ensure that you’ve done a good job, gently pull the wires, if it comes out, then redo the process but if it stays put, then applaud yourself for a job well done.
Pros:
● Fast connection
● Simple
● Highly Insulated
Cons:
● Expensive
What Type Of Solder To Use For Car Speaker Wire
The recommended solder to use for a car audio system is flux core solders. The other types of solder materials to use are lead-based and lead-free solders.
● Lead-Based Solder
This is the most popular solder for soldering car speaker wires. It comprises 60% tin and 40% lead and has a melting point ranging from 356-374 °F (180-190 °C). The combination prevents the formation of tin whiskers in wires. These are also called soft solders.
● Lead-Free Solder
Lead poisoning necessitated the ban of lead in the United States and other countries. This gave rise to the lead-free solder variant. Unlike lead-based solder, tin is added to metal in lead-free solder. They also have a higher melting point.
● Flux Core solder
Flux core solders are the most recommended solder for soldering car audio. Also, known as rosin flux-cored solder, they have flux in the center to facilitate an improved soldering experience. Although expensive, flux is great for preventing oxidation, thereby extending the lifespan of car speaker wires.
Can You Overheat Your Wires While Soldering
Though uncommon, overheating your wires while soldering is possible when you pass the recommended melting point of 361°F. This increases the risk of damaging the soldering point, causing you to restart the process from scratch. We recommend practicing with invaluable wires before soldering your expensive in-car speaker wires.
How To Troubleshoot Speaker Not Producing Sound
Ever switched on your car stereo system only for the speakers to produce absolute silence? There are several reasons for this and knowing the exact cause is important for troubleshooting. You also want to eliminate the guessing game as it is time-consuming and resource-intensive.
Proper diagnosis saves you money and your time.
The first thing to do is disconnect the speaker from the amplifier and connect another one to the same port. If it works fine, I.e produces sound without hassle, then you’re dealing with a damaged speaker. However, if it doesn’t play, check the connections and try again. Doesn’t play still, then the problem is from another source on your stereo system.
The second diagnosis involves plugging in the test speaker into one output channel and removing other speakers. If it doesn’t produce any sound, then you may want to check the head unit. Call a professional to check the components for any burnt-out fuse. We also offer replacement head units for car types here.
If the head unit is not the problem, then buying new speaker wires to reconnect your speakers and amplifiers would be necessary. As seen above, you can also repair the speaker wires. Choose from either soldering and crimp connectors. However, tiny wires can be a headache to repair. Hence, we recommend total replacement. While gauge is important, motorists can use slightly different wire gauges.


