Viper provides some of the best car alarm systems in the region. They allow you to do so many things at once, including warming up your vehicle while it is also armed to the teeth. The viper car alarm system is futuristic but doesn’t compromise the current needs of drivers. They are also affordable but require careful installation for guaranteed performance. How to install Viper Car Alarm System?
The installation process for a Viper alarm system is straightforward. You’ll need to follow a set of steps starting from dry testing the device to horn installation. Viper car alarm systems come with an installation guide to help drivers without the slightest technical knowledge install complex wires.
The reviews from verified Viper car alarm users have been incredible over the past years. This has attracted a limitless amount of buyers from across the United States, Canada, and Australia. Is it time to join the trend?
Table of Contents
Benefits Of Installing A Viper Car Alarm System
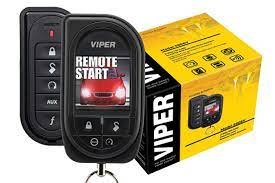
The most alluring benefit of owning a viper car is that it provides all-around security coverage when you’re both inside and outside the vehicle. You can control the alarm system with the keyless remote that is available inside the Viper kit. This key allows you to lock and unlock the vehicle, start the engine, and arm/disarm the alarm system.
Viper alarms also let you warm up the vehicle and on the AC before getting into your vehicle. This is particularly useful if you’ve been in the sub for a while and simply want to relax in a cool environment. Not all alarm systems have this feature, so you may want to ask before making a purchase.
With a Viper alarm keyless remote, you can also control and modify your car stereo system. That’s not something most keyless remotes are capable of.
Do You Need To Install A Viper Alarm System
Every vehicle should have at least one form of security installed. This could be simple as a one-way pager or as sophisticated as a GPS tracking device and advanced as an Immobilizer. Either one you choose will give a certain level of peace of mind. However, choosing a viper alarm system offers you more than the regular.
However, you may not need to install one if your vehicle already has a factory-installed system unless you need to upgrade, which is advisable. Newer Viper products have enhanced functionality and features.
STEP BY STEP VIPER CAR ALARM SYSTEM INSTALLATION
- Dry Testing The system
Before installing a viper alarm in your car, make sure you test it with a 22vokts supply in your home. This should be done to all the components of the kit to guarantee performance when installed inside your car.
To run the test after connecting it to a power source, use the remote fob to simulate door status, alarm trigger, 2-way pager features, and remote starting. These are the most important functions of any alarm system. Test it multiple times and record its response time. Viper car alarms have an immediate response time.
The commands from the remote fob are quickly decrypted by the brain and the function, executed without delay. Any delay in response time is a problem with the installation. Make sure you read the installation manual before commencing installation.
- Remove Lower Dash Cover
After testing the device in a controlled environment, it’s time to install it in your vehicle. To begin with, you’ll need to remove your lower dash cover. This requires having a screwdriver or panel removal. Make sure you secure the screws as you’ll need them to reattach the dash covering.
- Search For The Kill Switch Wiring
Advanced viper alarm systems have a kill relay to prevent ignition if it’s forcefully removed. While this is an important feature, not all motorists are bought on the idea. So to bypass it, simply connect the violet wire to the black volt.
- Test Ignition Wires
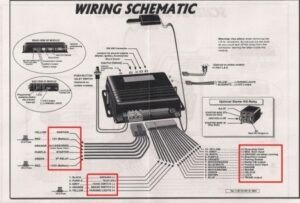
Idenify the ignition 1/2 and starter wires, as well as accessories wires. During installation, you’ll need to connect these wires to the remote start relate module.
- Replace Old Alarm System With Viper Car Alarm
You may not have to run wiring if you already own a viper alarm system. However, this does not apply to other brands. For example, owning an alarm system from XYZ company means having to start the installation from scratch. This can be daunting but is highly rewarding.
Disconnect the car battery by removing the negative terminal before replacing the old model or wiring from scratch. Check the manufacturer’s guide for more precautions.
You can use the H2 12 pin just connector or install a new one. If the old one is still working then, there is no need for a new installation. Also, with Viper products, you don’t have to worry about compatibility as the connectors are universal.
- Install The Brake Shut Down
The next step in this guide is to install the brake shut down. Connect the device to the brake pedal switch.
- Install the Neutral Safety Wire
You can find this wire on pin 1 of connector c21-4 on the car module.
- Install The Antenna
The antenna should be mounted in a good vantage point to enhance reception and facilitate the quick execution of commands. The most common mounting spot is behind the rearview mirror. However, you want to make sure it isn’t obstructing the road ahead. Also, check the laws of your state to confirm the mandate around windshield usage.
Don’t route the wire through open space to avoid breaking the cable. The driver-side pillar is available for inconspicuous routing.
- Install Remote Start Relay Module
This step requires disconnecting your car battery to avoid blown-out fuses and other electrical problems. You’ll also need to solder the connected wires so they don’t fall out. Specific wiring may require more tools and technical knowledge, so consult your installation guide before you begin this step.
You’ll also need tape in place to insulate the joints of the wiring. This is very important for preventing damages and short circuits.
- Future Programming
While upgrading to new techs enhances performance and, in the case of car alarms, improves security, they can cost a fortune. But that doesn’t make it impossible to enjoy the new features and functions of viper alarm systems. By leaving a spare programming cable plugged into the module, you can add new features without trouble. This not only saves you the money that would have gone into an upgrade, but it also guarantees maximum performance.
Nevertheless, make an inquiry into the compatibility of the new feature with your old Viper alarm system.
- Horn Installation
The horn installation is straightforward. And you don’t need to run complex wiring. You can do this by simply following the installation guide from the manufacturer. However, a general way of horn installation is routing the black wire to the car chassis.
- Test The Car Alarm System
Testing should be done before replacing the coverings. This is to prevent having to dismantle the installation to fix one small error. You can perform the following tests with the remote.
- Starting and switching off the vehicle
- Arming and disarming the alarm
IMPORTANT VIPER ALARM FACTS
The Viper alarm system is equipped with a blue LED that warns off intruders. This deterrent helps to prevent damage and car theft. The alarm system also has an immobilizer that prevents hot-wiring by shutting off the ignition and fuel pump. It is also a two-way pager system, allowing drivers to enjoy the full capabilities of an alarm system.
Conclusively, viper car alarm installation is simple as long you follow the steps and instructions stated above. However, it is wise to consult your manufacturer’s guide before commencing installation to avoid minor installation problems that may cause reduced performance in the future. Also, don’t forget to install a cable for future programming.

