Distorted and low sound is caused by several reasons, but pinpointing the exact cause can be difficult and frustrating. The most common cause, however, is poor wiring. Old and worn-out wires can become a problem over time, causing distortion and low fidelity sound, even from high-quality audio sources. This can be frustrating for motorists who simply want to listen to good music as they drive, or enjoy their favorite talk shows on satellite radio.
Identifying the damaged wire is easy with a multimeter. This helps you to quickly diagnose the problem and apply a solution. Wrong wire installation may also cause poor distorted sound. It’s best to test your wire with a multimeter during and after speaker installation. How to test speaker wire with multimeter? Keep reading to find out.
To test the speaker wire with a multimeter, adjust the dial to the specified ohms and touch the probes with the positive and negative speaker wires. Infinite resistance means it’s time to replace or repair speaker wire while average or low resistance means your speaker wires are fine.
Measuring the speaker wire with a multimeter provides accurate results, thereby removing the guesswork in discerning the level of wire health. Keep reading to learn the step-by-step process of testing speaker wires with a multimeter and other ways to test your speaker wires. But first, why do speaker wires go bad?
Table of Contents
Precautions To Take While Testing Car Speaker Wire With Multimeter
While a multimeter is a great tool to test your speaker wires, failure to follow the laid safety guide may cause harm and damage.
Here are common precautions to follow when testing speaker wires with a multimeter.
Examine the state of the multimeter before and after each use. The slightest damage or wear and tear may result in malformed results. Exposed contact with multimeter components may cause serious damage.
The probes should be covered and properly stored as the slightest damage will require buying a new one. Replacing the multimeter if you find a broken part will ensure your safety and guarantee an accurate reading.
While it is uncommon, exposure to the naked multimeter components may cause electrical shocks. Wearing protective gear when dealing with a multimeter reduces the risk of electrocution. Also, avoid using the instrument in wet areas.
Step By Step Instructions On How to Test Speaker With Multimeter
-
Unplug Car Audio System
Unplugging your stereo system is a necessary precaution to take before dealing with any electrical equipment, both inside and outside your car. This is for your safety as it prevents short circuits and blowouts to any of your stereo units.
Motorists should have pictorial evidence of the connection to ease reconnection. The complexity of speaker wires can confuse motorists. Wrong speaker connections can cause distortions and poor sound quality. Or power failure. While reverse polarity isn’t an issue, always connect the wires correctly.
-
Connect Wires to Battery
The next step is connecting the speaker wires to a 9V battery. Join the speaker wires with the receiver wires then wrap them on the battery and receiver. Release the lock control when tying to the wires from the receiver to prevent damage and accelerate your work.
-
Set Digital Multimeter to DC Voltage Setting
Switch the multimeter’s center knob and stop at the symbol marked with a capital “V” with a line. However, to make sure the multimeter is working fine, test it by touching both probes with each other.
If it reads 0 ohms or no resistance, you’re good to go. But anything else means you may have to use another multimeter. While multimeters are useful for testing speaker wires, avoid testing for polarity with it.
-
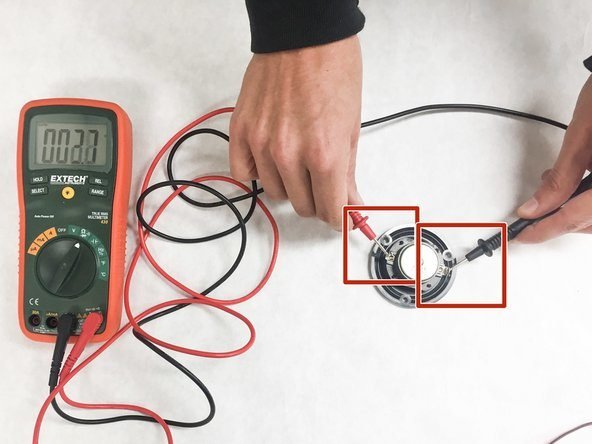
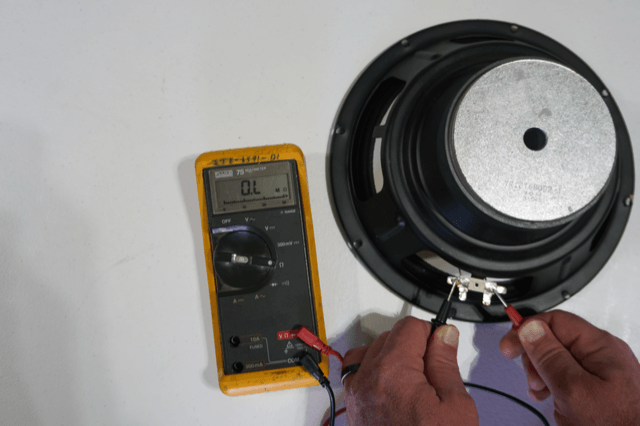
Test Speaker Wires
This is the last and most important step. Connect the probes on the multimeter to your speaker wires. Make sure the alligator clips are right and check the multimeter batteries.
If the multimeter is working perfectly, you should get a reading on the screen. A positive reading indicates that wires are properly connected but negative reading is an indication of a wrong connection, I.e, a positive is connected to a negative or vice versa.
Once again, don’t test for polarity with your multimeter. Switch the wires and check the reading again. If it’s infinite resistance, then your wires have a break that needs replacing. However, a small amount of resistance indicates a healthy wire.
Problems With Speaker Wires
Are you experiencing speaker wire problems? If so, then you’re not alone. Here are some reasons why your speaker may be faulty.
-
Connections
Wires are the most damaged speaker component, as well as connectors that fall out due to wear and tear. Sometimes, it’s just a loose connection that needs proper placement or fixing, and everything comes back to normal.
Before investing in new speakers or components, it’s advisable to make sure all the wiring and connections are tightly in the right places. You can do this by checking your connections every week, depending on your frequency of use.
Asides from loose connections, some speaker wires are not of high quality and fall apart fast. So, you also need to check the connected speakers to check for damages and wear and tear.
-
Grounding
Along with speaker wires, ground wires may be loose or damaged. This may be caused by traffic bumps of high activity around the area. Spilled liquid or load may also cause your wires to fall apart quickly and reduce efficiency.
Relocating your ground unit to a less disturbed area will help avoid rapid wear and tear. You can also protect it by covering it with wire guides. However, ground wires are usually the last place people look when trying to diagnose speaker problems.
Luckily, a sure way to know it’s from your ground unit is a buzzing sound from the speakers. While it may represent other problems like poor audio signal, higher chances are that your ground wires need repair or replacement.
-
Amplifiers
Audiophiles are particular about enhancing the quality of car audio, which is not complete without installing an amplifier. However, tweaking an amp to produce the right quality of sound requires skill and sound knowledge.
High frequencies distort while low frequencies may result in inaudible sound. Not every speaker problem is from speaker wires. Check the amp settings to make sure that it’s correct. Kill all the knobs and increase them one by one to pinpoint the source of distortion.
-
Blown-out Speakers
Blown-out speakers require immediate replacement as they produce poor sound quality. Motorists are disturbed with constant sound distortion. Blow-out speakers are the worst as the damage can cause total failure.
Repairing a blown-out speaker is possible but it requires creativity and advanced speaker knowledge, which is not common with most professionals and audiophiles. We recommend replacing any blown-out speaker with new and advanced speakers currently selling in the market. We provide high-quality car speakers of all sizes and prices.
The Best Type Of Speaker Wire
While just any type of wire will successfully transfer the signal between your speaker and amplifier. But using speaker wires between 12 and 16 gauge is most recommended for car speakers as they are thicker and have a better transfer rate than higher gauges.
Always look out for lower gauge wires since they are better at transferring signals between your sound system. However, there’s a caveat. Motorists are allowed to use up to 16 gauge wires for short connections but lower gauges for longer wire runs.
Asides from wire gauge, motorists are also concerned about wire polarity. Should you reverse the polarity and if so, does it have any effects on the quality of sound?
While we recommend correct polarity, I.e plugging the positive wires from the amplifier to the positive speaker terminal, and the same for the negative, reverse polarity is common and hasn’t damaged or affected sound quality.

