Trigger wires are not as popular as cameras and monitors, but they serve an important function in the rear view camera system, although their location and usefulness is still a mystery to most motorists. What is a trigger wire in a backup camera, where is it located, how do you install it in your vehicle? This article provides these answers and more.

A trigger wire transmits signals to energize or activate the monitor or rearview mirror in the vehicle to display the video signals being transmitted from the camera. This is different from a power cable, in the sense that power cables simply power on the device, while a trigger wire alerts the head unit to start displaying video once the gear is in reverse.
OEM installed rearview cameras have a reverse cable installed in the car, while an aftermath kit comes equipped with one. Finding the cable in your car can be a bit of a pickle, but this article will provide a guide to the common locations of a reverse wire in most vehicles.
GET EPIC DEALS ON AMAZON TODAY. UP TO 40% OFF.
Table of Contents
HOW TO LOCATE THE REVERSE WIRE IN YOUR VEHICLE
New vehicles are equipped with a reverse wire from the manufacturer, and finding the one in your car will save you money and time for a new installation. Let’s take a look at the common locations for reverse wires in vehicles.
Verify The Indication Changes On The Vehicle’s Touchscreen
Find out if your vehicle has a reverse wire installed without using tools and wasting your time by checking the indication changes on the vehicle’s touchscreen.
Most head units display the status of the reverse signal when the car is put in reverse. Check the information screen on the head unit to confirm the state of the signal.
If there’s one installed in your car, then it’ll switch between on and off as you change the reverse gear.
Check The Back Of The Head Unit To See If The Wire Is Installed.
The second method is a bit technical and will require a couple of tools, including a Phillips Screwdriver or panel removal. Depending on the type of screws holding your head unit to the dashboard, you’ll need one of the above tools to remove it.
Make sure you secure the screws in a safe place as you’ll need them to screw the Head unit back in place. Removing the Head unit is simple in some vehicles and won’t take much of your time, while complex installations might require consulting the manufacturer’s manual or a professional.
The only necessary precaution to take before unscrewing the unit is to incompletely turn off the vehicle. Now, you can unplug the 28-pin from the back of the head unit. The reverse wire is located in pin 2. Check that it is properly secured and connected to your rearview camera. Once you’re sure of the connection, screw the head unit back and mount properly.
Before going through the stress of unscrewing your head unit, first, check with your car manufacturer to know if a reverse wire is installed. This saves you time and energy. If it’s not, then you’ll have to buy an aftermath reverse wire.
HOW TO INSTALL A RESERVE WIRE IN YOUR VEHICLE
The importance of a reverse wire cannot be overstated. Every car owner should have one installed in their vehicles. You can buy it or get it with the complete rearview camera kit for less than $150. If you already have the camera, then buy a complete backup harness.
The reverse wire has two ends. One end has a pin that is connected to the 28-pin behind the head unit and the other end, to the vehicle’s wiring harness.
Always check for the distinct specifications in each wire harness to ensure that it is plugged in correctly. Some manufacturers indicate which end should go where, so read the instructions before commencing installation.
The main precaution to take is switching off your vehicle. You may also want to disconnect your battery for additional safety.
Next, unscrew the head unit using a Phillips screwdriver or a removal panel to access the 28-pin. Plug the pin end of the trigger wire into pin 2.
Consult the manufacturer if you experience any problem during installation.
Connecting The Reverse Signal To The Reserve Wire
After checking for the reverse side in the back of your head unit, the next step is connecting the other end of the wire to the side kick panel by the driver’s seat.
The process is fairly simple but requires a bit of technical experience. So, if you’re uncomfortable with wiring, hire a professional to handle the wiring. Nevertheless, you’ll achieve maximum results by simply following the instructions below.
Some cars have a push pin clip to remove the plastic covering the panel. Be careful not to break the panel retainer clips. Use recommended tools to remove screws and separate the wires inside the panel.
Next, you’ll find a pink wire in the 5th pin inside the panel. Route the reverse trigger wire to the sidekick panel, and tap into the pink wire. Test with shifting in and out of reverse, and cover the panel.
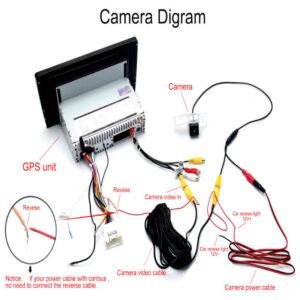
HOW TO CONNECT REAR VIEW CAMERA TO HEAD UNIT
While most cars after May 2018 come equipped with a rearview camera, older cars lack this essential device but have radios with video monitors. You can connect the camera to the head unit in the car by connecting the right wires and plugs.
However, confirm the video output on the back of the head unit before commencing installation. This is usually a yellow RCA plug. Also, check the manufacturer’s manual. If you find the plug, then you’ll need several necessary tools, such as a Phillips screwdriver, trim removal tools, and pliers.
Remove The Panels
To access the plug behind the head unit, you’ll have to remove the dashboard, head unit, and other obstacles in the way. Next, find a favorable installation spot for the camera in the rear or side of your vehicle.
Some kits come with multiple cameras for the car rear and sides. This means you may need to find multiple installation spots around the car.
While there’s a sweet mounting spot in the license frame, other areas may require drilling and modification. So get a drilling machine before you commence installation.
Next, connect the cables.
- Connect the DC power to the DC female plug of the camera. Make sure polarity is correct by plugging positive to positive and negative to negative.
- Connect one end to the reverse light camera
- Connect RCA male plugs on each end of the female plugs on the camera
- Connect the trigger wire to positive reverse wire
Next, connect both devices with the connected cables. Plug the other side of the male RCA cable to the radio video input. Next, connect the trigger wires as instructed above. If you’ve forgotten, simply scroll back up. Another reason to bookmark this article now.
Connecting a wireless rearview camera requires a different process, tool, and materials. To send and receive signals, it comes with a receiver and transmitter.
The transmitter is mounted close to the camera while the receiver is by the monitor. Image signals are transformed into radio signals and changed back by the receiver.
Wireless installation reduces the number of connections you have to make in your car. They are also available in analog and digital.
Conclusively, trigger wires play a very important role in the transmission of signals from your camera to your head unit, monitor, or rearview camera. If you’re experiencing any sort of signal delay, check the trigger wires for any damage. You can follow the exact steps stated above to replace any damaged trigger rear view wires. You can find a trigger wire harness. We also have reviews of good rear view cameras at a good price.

